
Freedom Force Character Creation Guide
Freedom
Force comes with a powerful character creation system that allows you to create
virtually any Superhero. With over 50 attributes and hundreds of pre-made
powers, you take your favourite comic book hero and bring him to life. In
addition to the dozens of models that ship with the game, you can download free
meshes and skins from sites like http://www.freedomforcecenter.com/
and http://www.skindex.net/. At the time
of this writing, there are more than 50 meshes and 500 skins already available
for download!
Despite the
enormous power of the Freedom Force character creation system, creating your
very own custom character is very easy and straightforward. Just follow these
simple steps:
First of
all, press the ‘characters’ button in the main menu and you’ll be taken to the
Characters screen. In the demo, the characters screen can also be reached by
pressing the ‘characters’ button in the base screen.

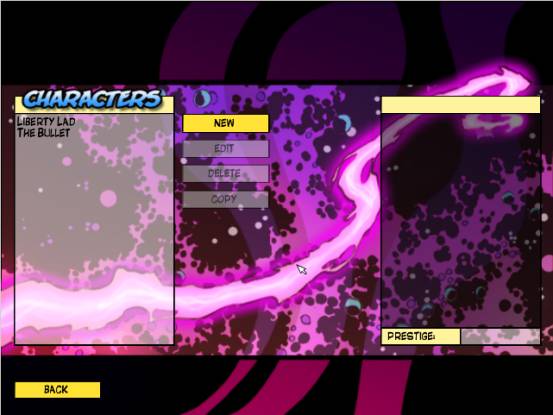
This is the
Characters screen. From here, you can create a new custom hero, and edit,
delete or copy an existing one. Create a new hero by pressing the ‘New’ button.
Select A
Mesh: A mesh is the model that will be used for your hero. Each mesh has it’s
own distinctive set of animations, and some meshes are better suited for
certain roles than others. Choose a mesh and hit OK.

You are now
in the character creation screen. Here you can define your character’s Stats,
Powers and Attributes. A character’s Stats determine his
basic strengths and abilities – how strong he is, how fast he runs and so
forth. Powers represent his active abilities: fireball throwing,
teleportation, melee attacks or magical shields are all powers. Finally, Attributes
represent his inherent strengths and weaknesses; resistance to fire,
vulnerability to radiation, the ability to fly or razor-sharp claws are all
attributes. The final important attribute for a character is prestige,
which represents how many prestige points are needed to recruit your custom
character into the game. All stats, powers and attributes have an associated
prestige cost, and the more powerful a character is, the higher his prestige
cost is going to be.
First of
all, decide on what stats your character will have. Stats have a range from 1
to 10; the normal person is assumed to have stats of around 2. But your
character isn’t a puny normal person, she’s a superhero! Each step in a stat is
progressively more expensive than the last.
A
character’s main stats are:
Str – Strength, the
characters ability to lift heavy objects. A high strength allows your character
to deal more powerful melee attacks.
Spd – Speed, the higher
this stat is, the faster your hero moves.
Agl – Agility, the ability to hit and
dodge in melee. The higher this stat is, the more likely it is that you’ll
dodge attacks and hit with melee attacks of your own.
End – Endurance, a measure of your hero’s
grit and toughness. Your hero’s health points are based on your endurance; the
higher it is, the more damage your hero can take.
Eng – Energy. All heroes use energy to
power their attacks and superpowers; the higher this stat is, the quicker their
energy pool recovers. Without a good energy stat, your hero can run out of
power and stun herself if she tries to use too many expensive powers.

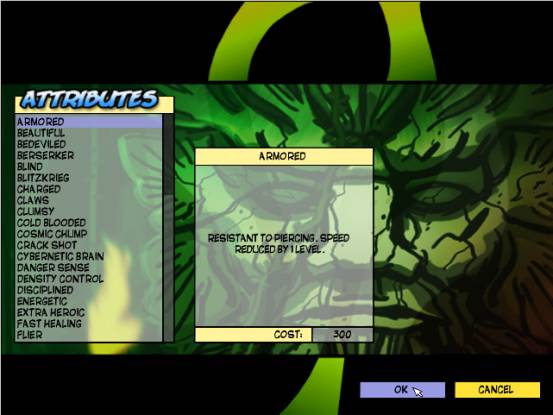
Next you’ll
need to select your hero’s Attributes. Here you can choose from a wide
range of special abilities – regeneration, armor-plating, flying – the list
seems endless. Not all attributes are good, some actually penalize your
character, which gives you points back that you can spend elsewhere.
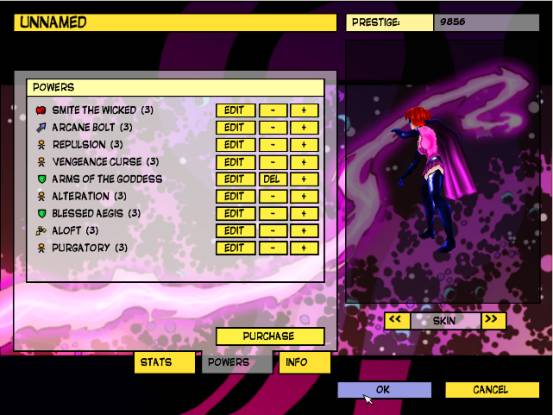
Now that
you’ve chosen your stats and attributes, its time to get down to the real
nitty-gritty, the power creation system. First click on the ‘powers’ tab. Here
you’ll see that your hero already has a full complement of powers. You can
delete these and create your own, or edit their appearance and properties.
Finally, you can ‘level up’ your powers by pressing the plus button next to the
power name. Levelling up a power costs points, but it improves almost every
aspect of a power. Powers have five levels of power, and reducing a power’s
level below 1 deletes that power from the list.
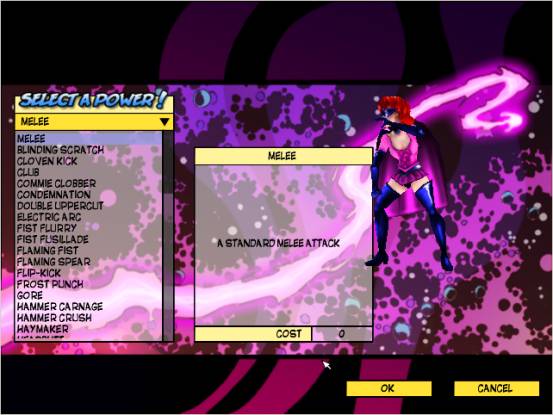
Let’s
create a new power for your hero. Click on the ‘Purchase’ button.
Select a
Power: Powers are divided into eight categories – Melee, Projectile, Beam,
Area, Direct, Active Defense, Passive Defense and Special.
Melee covers punches, kicks and so forth.
Projectile powers are ranged attacks that
launch a missile of some sort at a target. Projectiles can have several special
abilities, such as homing, multiplication or explosive radius.
Beam attacks are slightly more limited
than projectiles, but are less likely to strike intervening obstacles.
Area powers strike everything in a
radius around the character.
Direct attacks are ranged powers that
never miss and cannot be dodged. They are expensive but powerful, and are often
used to inflict bad states on enemies.
Active
Defences are
shields that can protect against a wide range of attacks, but generally cost
energy to use and have a limited duration.
Passive
Defences are more
expensive defenses that are always on, and have a chance of automatically
protecting the character against certain attacks or states.
For now,
let’s make a melee power. Click on the first power in the melee list and hit
‘OK’.
Okay, this
is the melee power screen. Here you can decide what your melee attack can do.
There are several important fields here.
Damage
Type: there are a
lot of different damage types you can choose from here. Your attack can do
dozens of different things, from dealing damage to inflicting a bad state like
blindness or freezing them in a block of ice!
Magnitude: If the attack deals out raw
damage, magnitude defines exactly how much damage is dealt. For attacks that
cause bad states (like freeze or stasis), magnitude represents how difficult it
is for an enemy to resist that power. If your power has a magnitude of ‘none’,
then the enemy will always resist it!
Energy
Point Cost: All
powers have an associated energy cost. The more energy a power uses, the
cheaper it is. A power with little or no energy cost will be a lot more
expensive, but also more useful.
Stun: Stunning is a very important
concept in Freedom Force. If you stun an enemy with an attack, he becomes
helpless for a few seconds, giving you a chance to further pound on him. Stun
is represented by a percentage chance – the higher the stun level, the higher
the chance.
Knockback: Knockback is a way of inflicting
extra damage on an enemy and getting him out of the fight for a moment. The
higher the knockback, the more extreme the effect – light knockback might only
send a bad guy sliding for a few feet, but extreme knockback will send him into
the statosphere!
Swiftness: Swiftness is a measure of how hard
the attack is to dodge.
Arc: Arc melee attacks strike everything
in a certain radius around the character, making them much more powerful than
normal melee attacks.
Power
Flags: Most powers
also have ‘power flags’, which appear as tick boxes on the power screen. Power
flags change the way a power works – for example, ticking ‘up knockback’ on a
melee power causes the knockback force it deals to be directed up instead of
across, which knocks enemies into the air.

Now that
we’ve defined what our melee power does, its time to set up the animation and
fx for it. Setting these things up is really easy and works the same way for
all powers. Click on the ‘animation and fx’ tab. Here you can round out a power
by choosing what animation and special effect will be used for that power. As
you can see, there are three fields that change based on the animation you
choose:
Start
Time: Start time
tells you how long it takes to launch the power. Think of it as a ‘wind up’.
Total
Time: Once a power
has been launched, a character still has to take a moment to finish the motion
they were performing. Think of it as a ‘wind down’.
No.
Contacts: The
number of contacts defines the number of times a power is launched. If a melee
attack has three contacts, then it has the potential to hit three times, while
a projectile with three contact points will fire three times with a single
shot. Contact points are a part of the character’s animation and can not be
changed.
Finally,
select a special effect from the list. Pick whatever special effect you like –
special effects are cosmetic and have no bearing on how a power works. Now just
name the power by clicking in the name box in the top left corner and type in
the power’s name, then hit ‘OK’. Your custom melee power is now complete!

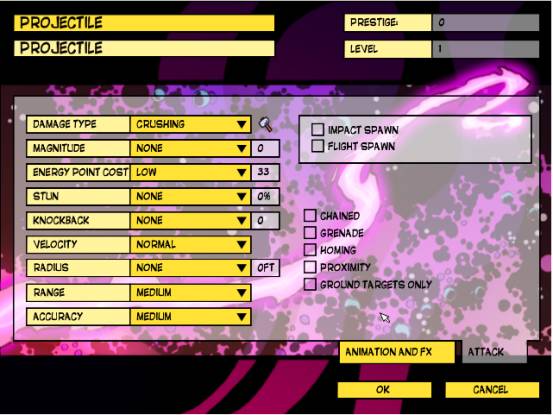
Projectile
and beam attacks strike targets at a range. They have the following additional
fields:
Velocity: Is a measure of how quickly the
projectile or beam moves towards it’s target. A low velocity attack travels
relatively slowly, while a very fast velocity attack is virtually instanteous.
Radius: If a projectile attack has a
radius, it becomes an explosive attack which hits everything within that radius
on impact. Beam attacks cannot have a radius.
Range: Range defines how far the attack
can travel.
Accuracy: Accuracy is the base chance the
attack has to hit. The farther away a target is, the lower your accuracy
becomes, so a good accuracy is important. Certain attributes, like crack shot,
can increase overall accuracy for all your powers.
Area
attacks strike everything in a radius around your hero. Area attacks can be
very useful if bad guys surround your hero, but they’re expensive, and you have
to be careful not to catch friendly characters in the blast.

Active
defenses protect your character against certain kinds of damage and attacks.
While an active defense is up, your hero cannot use other superpowers. By
default, a hero cannot move while using an active defense, but the ability to
move while using the shield can be bought. Active defenses use the following
fields:
Damage
Blocked: Here you
can tick the boxes to decide what kinds of damage your shield blocks against.
The more types of damage your shield can block, the more expensive it becomes.
Block
Type: By default, a
shield has a block type of ‘normal’, meaning the shield simply takes the damage
dealt instead of the hero. You can also choose from these options:
·
Deflect: Instead of
striking the shield, the attack is deflected in a random direction.
·
Reflect: The attack is
directed right back at the attacker who fired it.
·
Redirect: The attack is
directed at the nearest enemy character.
·
Absorb: The shield
absorbs the attack, which returns energy points to your energy pool.
EP Cost: Defines how much energy an active
defense costs to use. The cheaper the energy cost, the more expensive the
power.
Duration: How long an active defense stays
up.
Hit
Points: A measure of how much damage a shield can
take before it collapses. For shields that reflect or absorb attacks, hit
points are irrelevant.

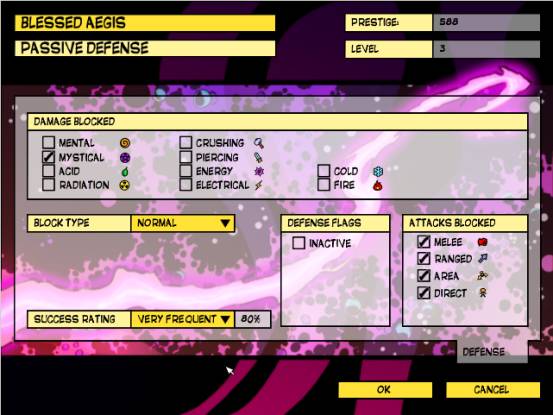
Passive
defenses are more powerful and expensive than active defenses, because they
don’t cost energy to use and are always on. The trade-off is that they’re not
as reliable.
Damage
Type: Like active
defenses, passive defenses don’t automatically protect you against everything.
You have to select which damage and attack types are blocked.
Block
Type: works the
same way for passive defenses as active defenses.
Success
Rating: Passive
defenses don’t always work 100% of the time, unlike active defenses. The
success rating is the percentage chance of the defense activating if you’re hit
with an attack.
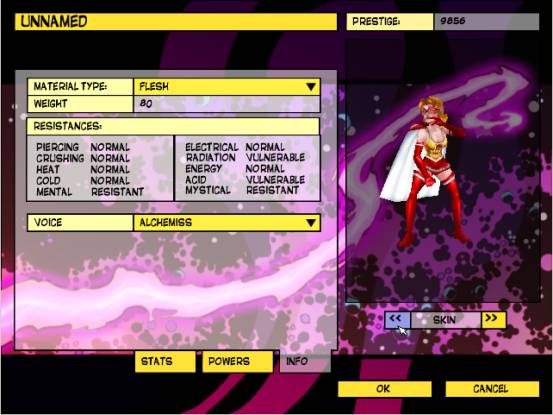
The info
tab: Here you round out the final details of your character. These details
include:
Name: You can name your hero at any time
by clicking on the name box in the top left corner of the screen and typing in
a name...
Skin: you can choose your hero's skin at
any time by clicking the left and right arrows next to the model of the hero.
Changing a hero's skin changes his or
her
appearance within the game. Keep in mind that their appearance will only change
if there are extra skins available for that mesh.
Material: material describes what your hero
is made out of, be it ordinary flesh, steel or even rubber. Certain materials
better protect your hero against
damage, but
cost you points.
Voice: here you can select the voice your
hero uses. Just select one from the list.
That's it,
your custom hero is now complete! Take some time to experiment with the hero
creation system; we hope you'll find it to be fun, flexible and powerful.
Good luck
heroes, now fight the good fight!